Compatibility of Show Files Among All Vi Consoles in Relation to Hardware Configurations.
The main difference between Vi Consoles is whether they require the use of the Local Rack, or not. However, we now have two versions of the Local Rack, so there are differences to consider there, as well. This document will talk about how input channel count, bus channel count, sample rate, GEQ display format, patching, and features can be compromised by sharing show files among the Vi Series Consoles.
List of Consoles
Vi1, Vi2, Vi4/400, Vi6/600, Vi1000, Vi2000, Vi3000, Vi5000, & Vi7000
First, let's split these consoles into two categories:
Control Surface + Local Rack
Vi2 (1st Gen) Vi4/400 (1st Gen)
Vi6/600 (1st Gen)
Vi5000 (2nd Gen)
Vi7000 (2nd Gen)
| Console (No Local Rack) Vi1 (1st gen)
Vi1000 (2nd Gen)
Vi2000 (2nd Gen)
Vi3000 (2nd Gen)
|
Control Surface + Local Rack: 1st Gen vs. 2nd Gen
Overview
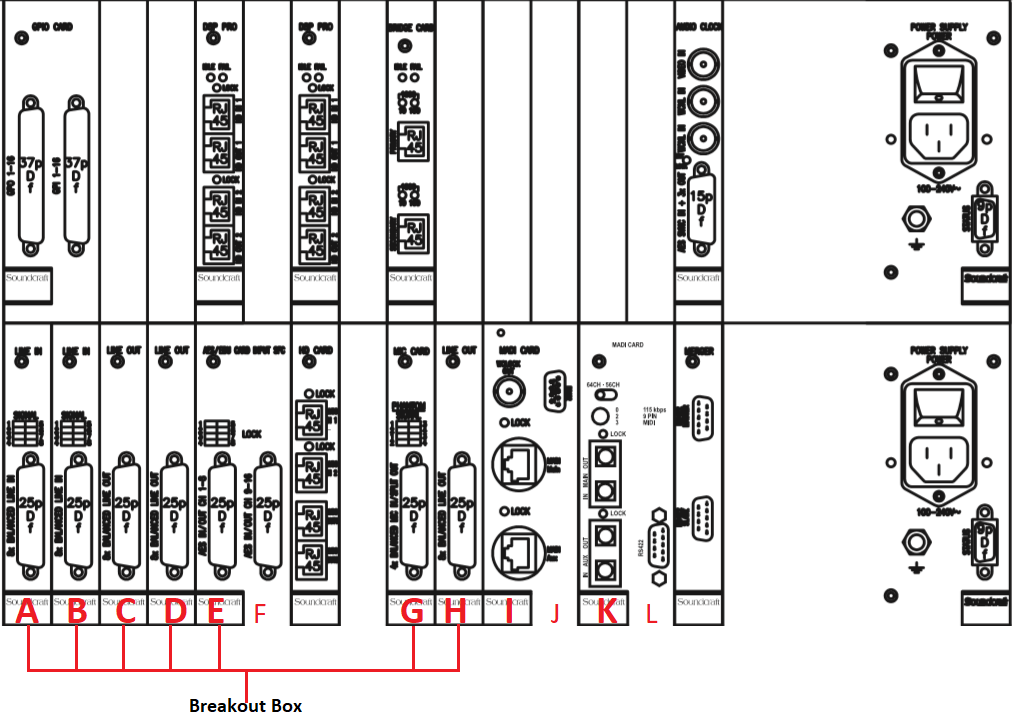
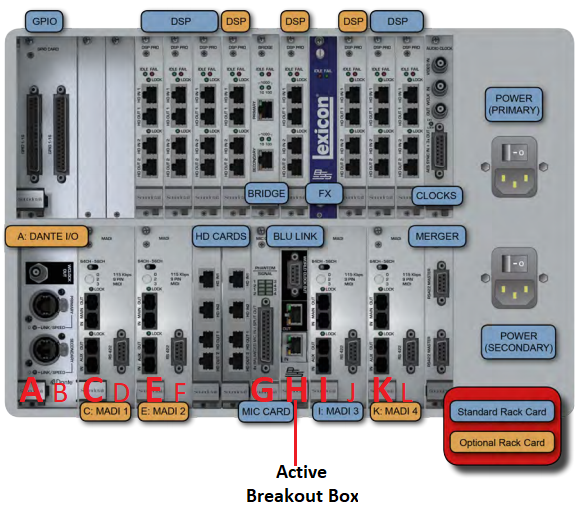
Let's look at the differences in hardware between the 1st Gen & 2nd Gen Local Racks.
1st Gen
| 
|
2nd Gen
| 
|
When I/O card types and their associated card letter do NOT match, from one local rack to another, any patching for that card slot will be lost when loading the show file. This may result in the need to perform an I/O reconfig (reconfig button found at the front of the local rack), due to the confusion between show file config vs. actual hardware config. See below for more details…
Breakout Box:
The 1st generation local rack uses 7 x D21m cards, a mixture of mic, line, & AES to route the signals to and from the breakout box. The 2nd generation local rack consolidated these signal types by converting to our proprietary BLU Link digital-audio protocol, and only uses 1 x D21m card to handle the streams, to and from. Moving show files from one generation to the other will always result in patching loss associatd to the breakout box/active breakout box.
MADI & Dante Cards:
The 1st generation local rack housed two MADI cards that can be found in card slots I & K. The same pertains to the 2nd generation, however, an additional 2 MADI cards were added to slots C & E, and Dante to slot A. If taking a show file built from a 2nd generation local rack (Vi5k or Vi7k) and load it to a 1st generation local rack (Vi4/400 or Vi6/600), any routing from cards A, C, & E would be lost. Card slots A, C, & E, in the 1st generation local rack, are used to handle Line & AES signals from the breakout box.
Stagebox(s):
To keep your stagebox patching and preamp settings, when using show files from one generation to the other, a MADI card must be present in the same card slot that the show file was saved to initially. If using the default stagebox card slots, I & K, this won't be an issue within the Control Surface + Local Rack models, or the 2nd Gen Console (No Local Rack). We will talk about how this can be a problem when crossing show files between the two types of consoles we offer, later in the document.
Channel Count:
Each HD card in a local rack can handle 192 channels in/out. The 1st generation local rack comes equipt with one HD card, while the 2nd generation comes with 2, enabling 384 channles in/out. If utilizing more than 192 channels in/out with a show file built from a 2nd generation local rack, all channels used after 192 will be lost when loaded in a 1st generation local rack.
DSP Card Count:
If you intend to load a show on another Control Surface + Local Rack, consider the below specifications if the DSP card count is LESS than it was originally when the show file was created. You may run into feature loss, sample rate reduction, input channel-count loss, and/or bus channel-count loss.
1st Gen (Vi4/400 & Vi6/600)
- 2 DSP Cards (Prior to software v3.0
- 48kHz only, enabling…
- 64 inputs
- 32 mono that can be paired to 16 stereo busses
- 3 DSP Cards (Requires 3.0 software or higher)
- 48kHz only, enabling...
- 96 inputs
- 32 mono that can be paired to 16 stereo busses
- 4 DSP Cards (Requires software v4.8 or higher)
- 48kHz only, enabling...
- 96 inputs, if...
- 64 inputs, if...
2nd Gen (Vi5000 & Vi7000)
The introduction of BSS DPR901 Dynamic EQs (x16), vMIX Automixing (4 groups of up to 16 channels), Gate/Ducker processing on busses, and increased input count changed the minimum DSP card count required for the 2nd generation local rack. As you can see below, 2 or even 3 DSP cards are not an option as before.
- 5 DSP Cards
- 48kHz, enabling...
- 64 inputs
- 32 mono/stereo busses
- 6 DSP Cards
- 48kHz only, enabling...
- 128 inputs
- 32 mono/stereo busses
- 8 DSP Cards
- 48kHz, enabling...
- 128 inputs
- 32 mono/stereo busses
- 96kHz. enabling....
- 64 inputs
- 32 mono/stereo busses
Console (No Local Rack): 1st Gen vs. 2nd Gen
Overview
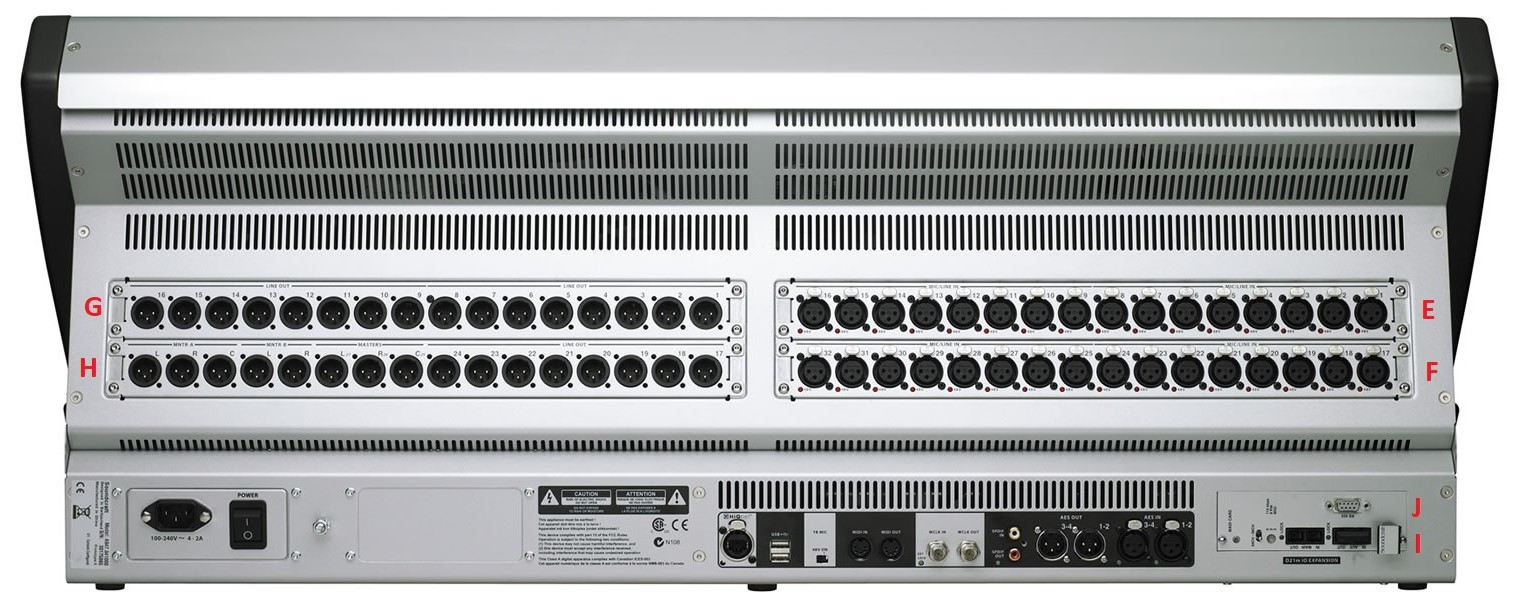
The 1st generation consisted of the Vi1, alone. It was the first of its kind in the Vi Series which elliminated the local rack entirely. All DSP & local I/O housed and processed internal to the desk.
1st Gen
| 
|
NOTE: The 1st generation Vi console (Vi1), can have a second group of D21m slots intergrated by use of the Compact Stagebox. The Compact Stagebox comes with a group of 2 D21m card slots, identified as K & L. However, this will limit all four slots, I, J, K, & L to a cumlative channel count of 64x64 since K & L are piggy-backing signal flow from I & J. The channel count for the MADI HD card (in the Compact Stagebox) and whichever card(s) are used in K & L (expansion slots in Compact Stagebox) will have to be limited by adjusting the dip switch settings on the cards themselves. The cards installed to the compact stagebox should have a cumulative channel count of 64x64. Otherwise, K & L will show up as “Blocked" in the software.
The 2nd generation Console (No Local Rack) consists of the Vi1000, Vi2000, & Vi3000 and introduced a second group of local D21m card slots, identified as cards K & L, as well as local MADI (B) & Dante (A).
2nd Gen
| 
|
DSP & Channel Count:
If you intend to take a show file, built from a 2nd generation Console (No Local Rack), and load it to a 1st generation Console (No Local Rack), expect channel count reduction, loss of local Dante & local MADI, and loss of Card slots K & L (without the use of the Compact Stagebox).
Both the 1st & 2nd generation Console (No Local Rack) contains a fixed DSP & channel count. The channel count varies depending on which I/O configuration was purchased with the console: 48 inputs vs. 32 inputs.
1st Gen (Vi1)
FIxed DSP: 4x DSP SpiderCore
- 48 input version (3x input cards; 1x output card)
- 119 inputs
- 88 outputs
- 24 mono/stereo busses
- 32 input version (2x inout cards; 2x output cards
- 87 inputs
- 104 outputs
- 24 mono/stereo busses
2nd Gen (Vi1000, Vi2000, Vi3000)
With double the processing power, the 2nd generation Console (No Local Rack) introduced local Dante (64x64), Local MADI (64x64), and added another pair of expansion slots (K & L) capable of 64x64. This increased the channel count significantly, from 1st to 2nd generation. Keep in mind local MADI & local Dante share their inputs while having paralleled outputs. In other words, you can only receive inputs from either local MADI or local Dante through software configuration. Both local MADI & local Dante can patch outputs simultaneously.
- Fixed DSP: 8x DSP SpiderCore
- 48 input version (3x input cards; 1x output card)
- 245 inputs
- 214 outputs
- 24 mono/strereo busses
- 32 input version (2x input cards; 2x output cards)
- 213 inputs
- 246 outputs
- 24 mono/stereo busses
If you attempt to load a show file that utilizes inputs 33-48 on a 32-input system, you will lose all patching associated to those channels. The same will occur with outputs: if you attempt to load a show file with outputs 17-32 on a 48-input system, you will lose all patching associated to those channels.
Small/Large GEQ Display
One feature that separates Vi models from one another, is the amount of Vistonics bays it comes with. Vi models with 2-3 Vistonics bays display the GEQ information differently than a console with 4-5 Vistonics bays. Having 2-3 Vistonics bays will display the GEQ on the Master Fader board with 4 banks of frequencies that you cycle through with next/previous page buttons. Consoles with 4-5 Vistonics bays display this a bit differently. All GEQ frequencies will be spread out among bays 1-4, eliminating the need to change banks. This GEQ display type (small vs. large) is embedded to the show file. This will cause issues If opening a show file built from a console with 4-5 Vistonics bays (saved as large GEQ display) to a console with 2-3 Vistonics bays (only compatible with small GEQ display). One of the following will occur when changing frequency banks:
- The software will force you out of GEQ, all together.
- Each of the 4 banks will display the frequency range from bank 1.
THERE'S A SOLUTION!
NOTE: Consoles with 4-5 Vistonics bays are compatible with both Small & Large GEQ display formats.
Convert Show File Format from Large GEQ Display to Small GEQ Display
This can be achieved in one of two ways:
- With one of the following consoles:
- Vi400
- Vi600
- Vi3000
- Vi5000
- Vi7000
- With one of the following “CURRENT" Virtual Vi offline editors:
Click Here to get the latest version of Virtual Vi offline editor.
I will be using Virtual Vi to illustrate the steps needed to convert your show file. The steps are the same when doing this from one of the above-mentioned consoles.
1. First, let's open the show file:
From Virtual Vi offline editor:- Connect a USB flash drive to the USB port on your computer, with the show file saved to it. Then, launch one of the above listed offline editors.
From Console:- Load show file from console & skip to Step 5 (if saved to console already) Or…
- Connect a USB flash drive, with the show file saved to it, to a USB port on the console.
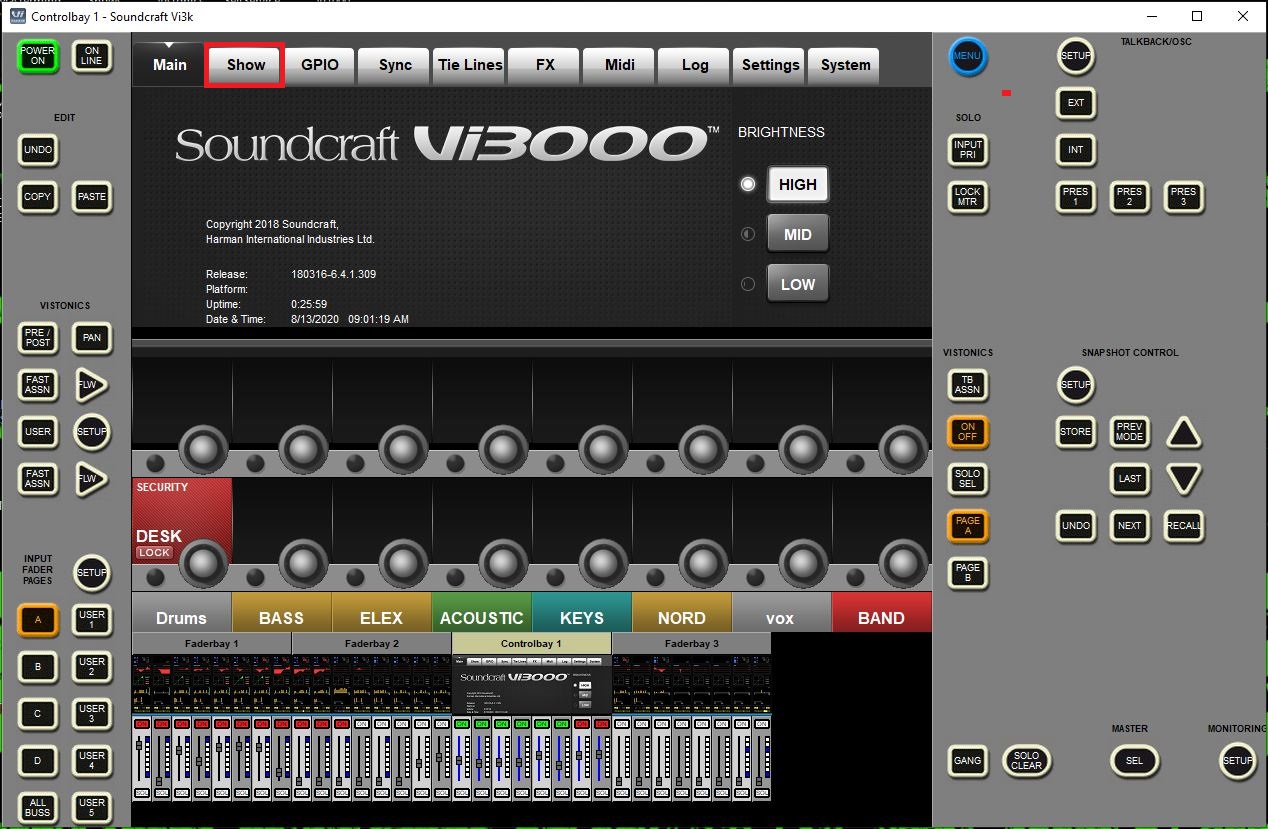
2. Select the MENU button
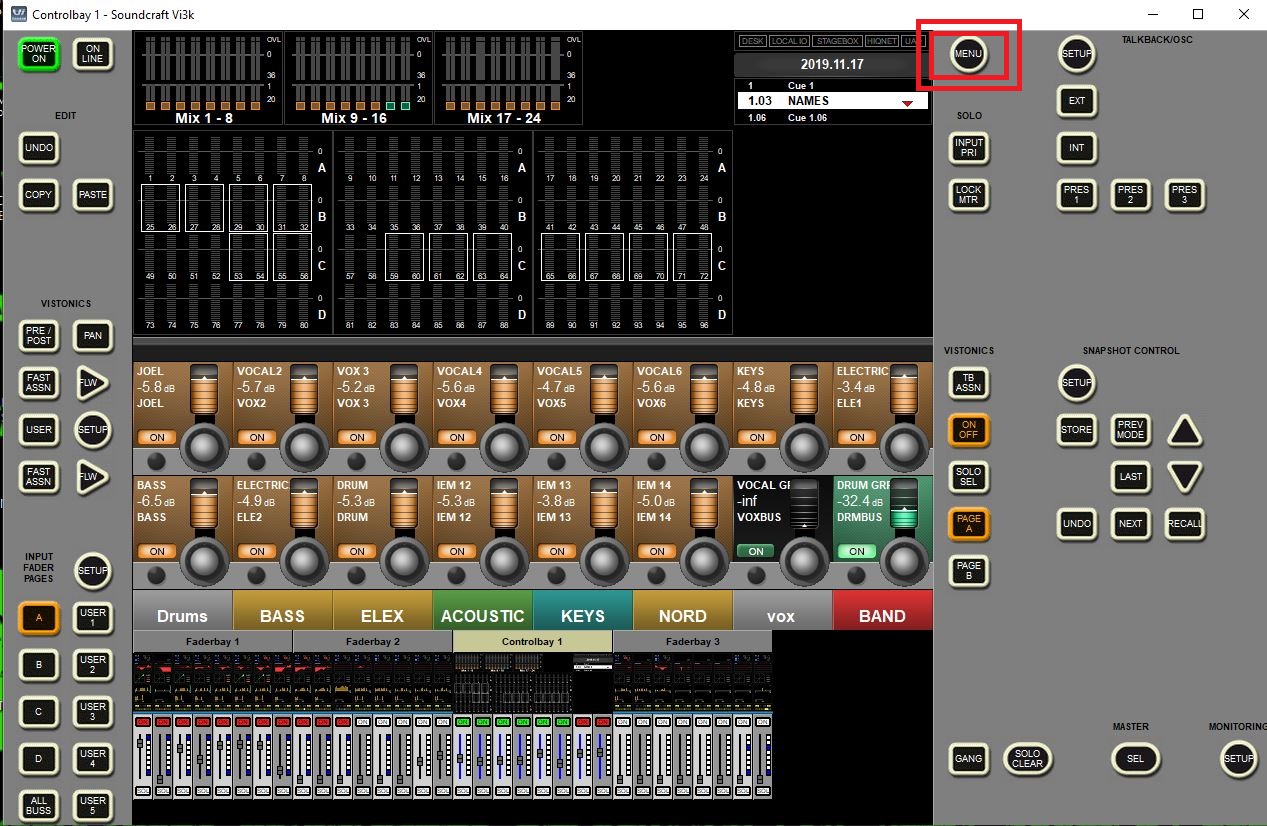
3. Select the SHOW tab
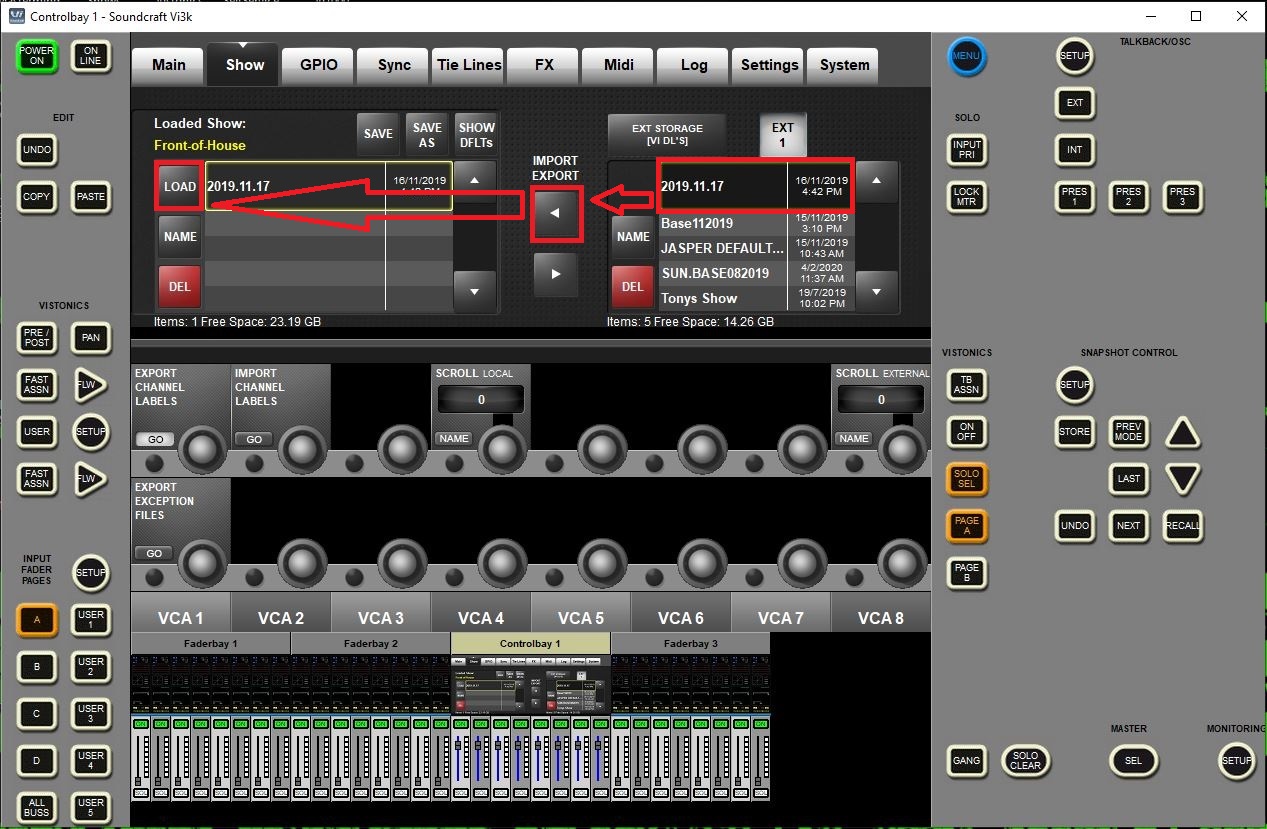
4. Copy Show file over to internal storage & LOAD Show
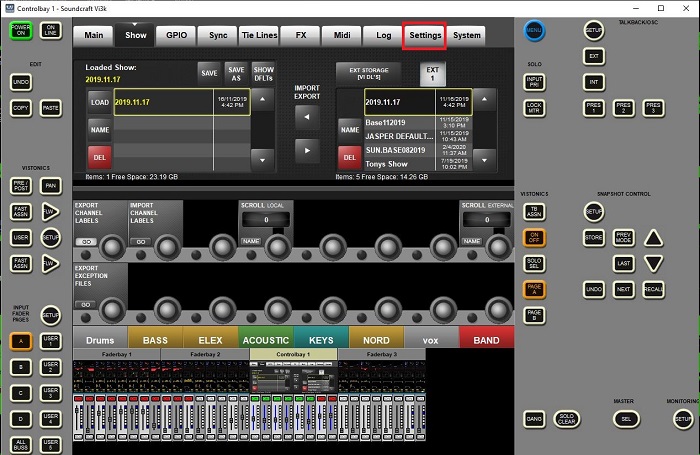
5. Select the Settings tab
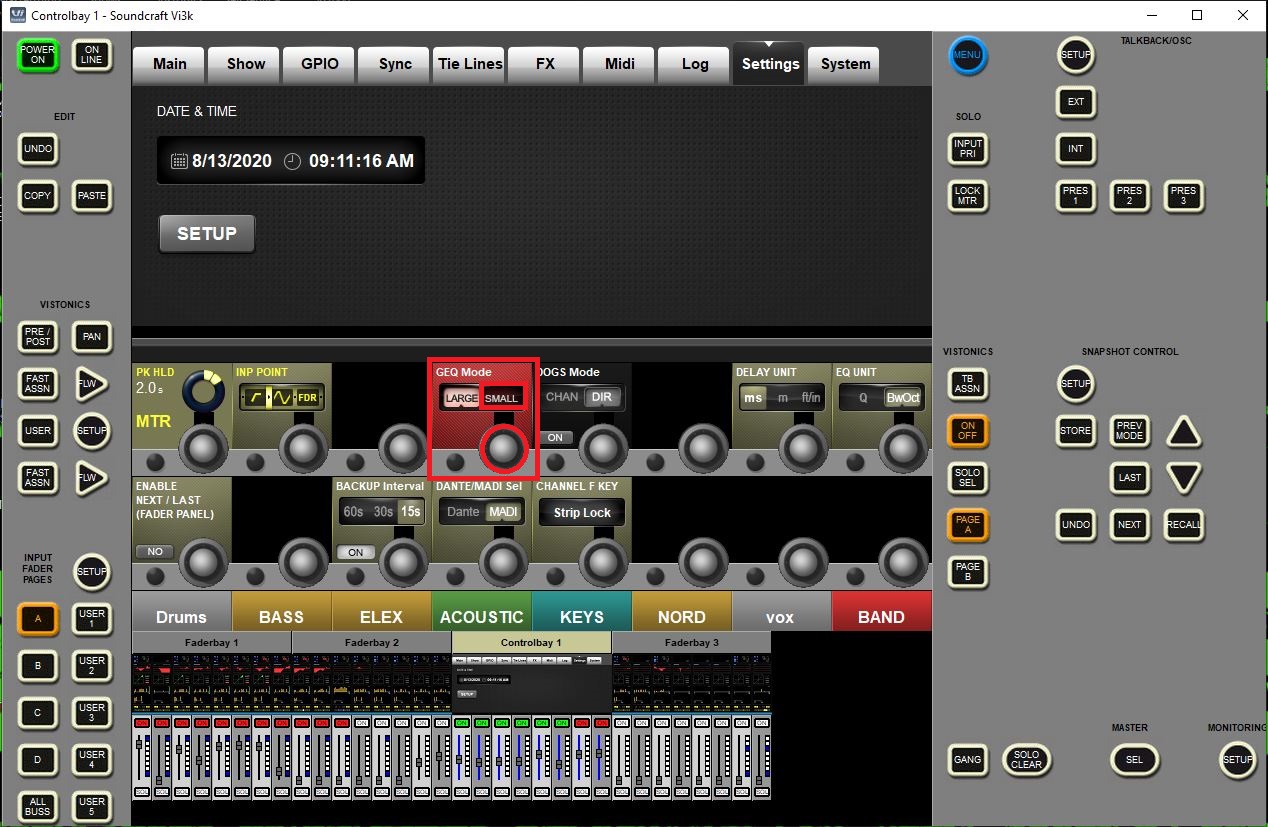
6. Use the GEQ Mode encoder knob & highlight "Small"
7. Select the Show tab & select "Save As"
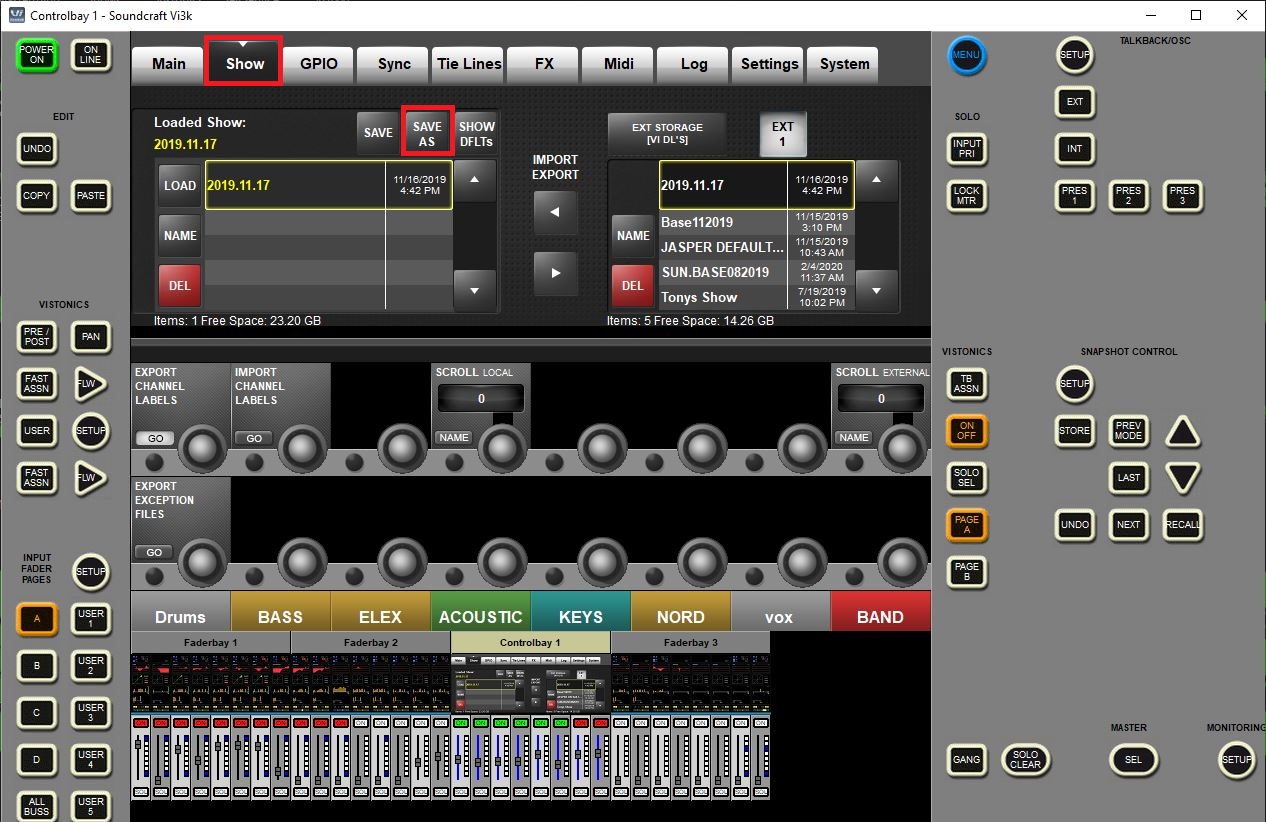
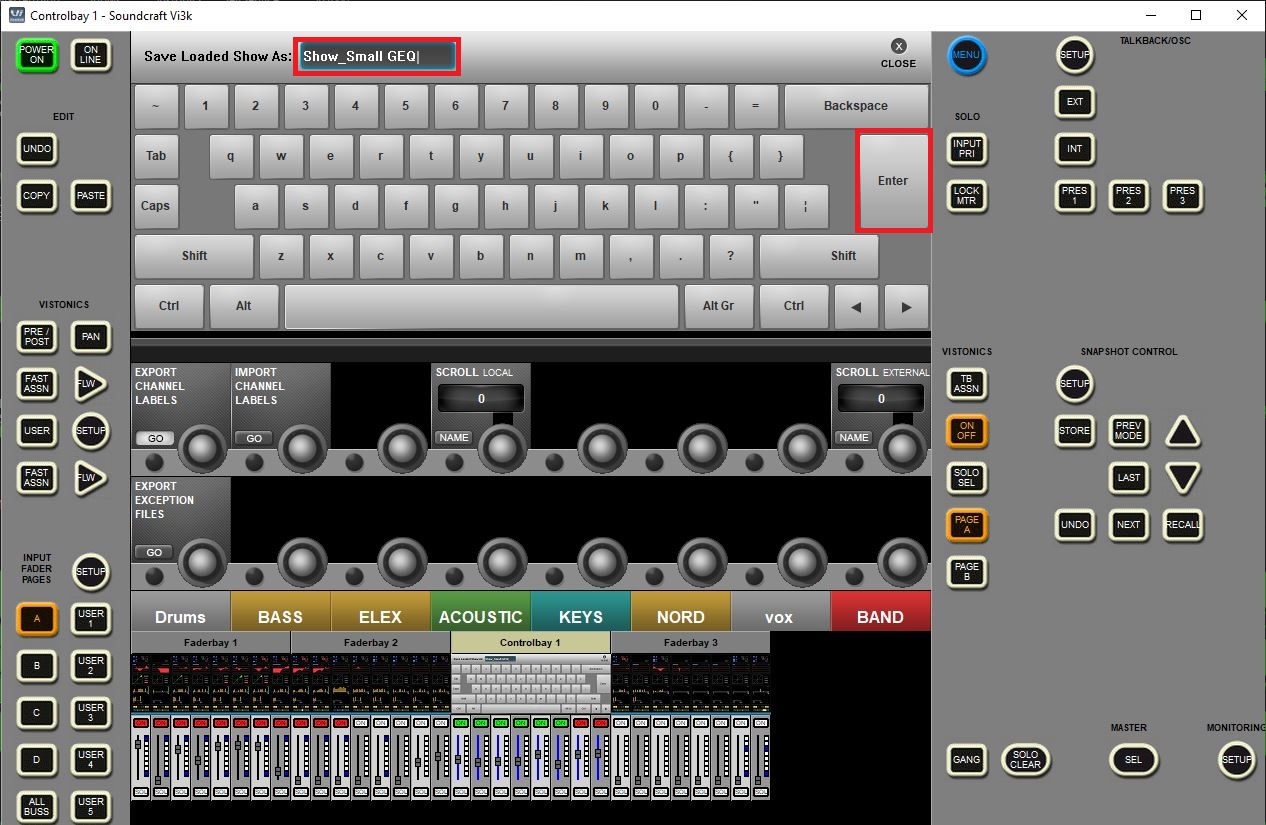
8. Name Show file with unique indetifier for Small GEQ format.
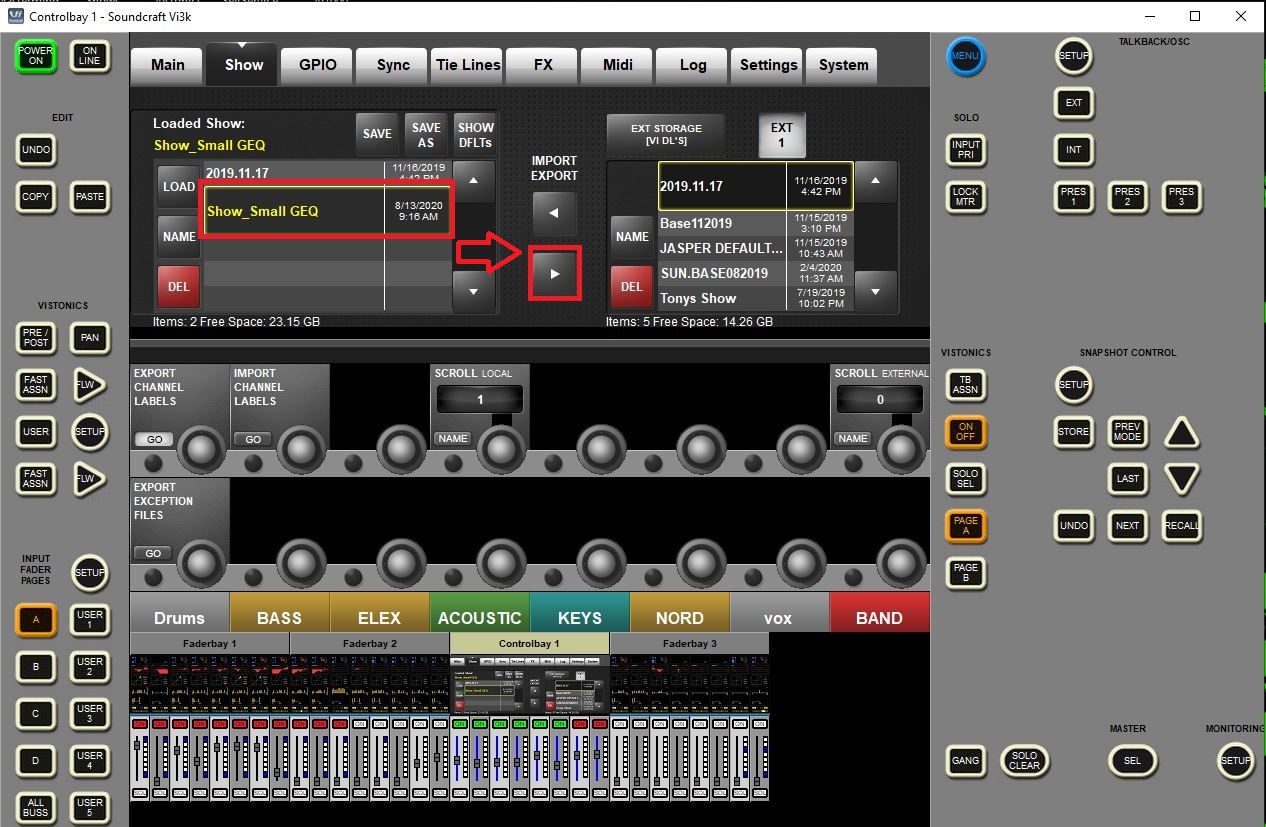
9. Copy Show to external storage
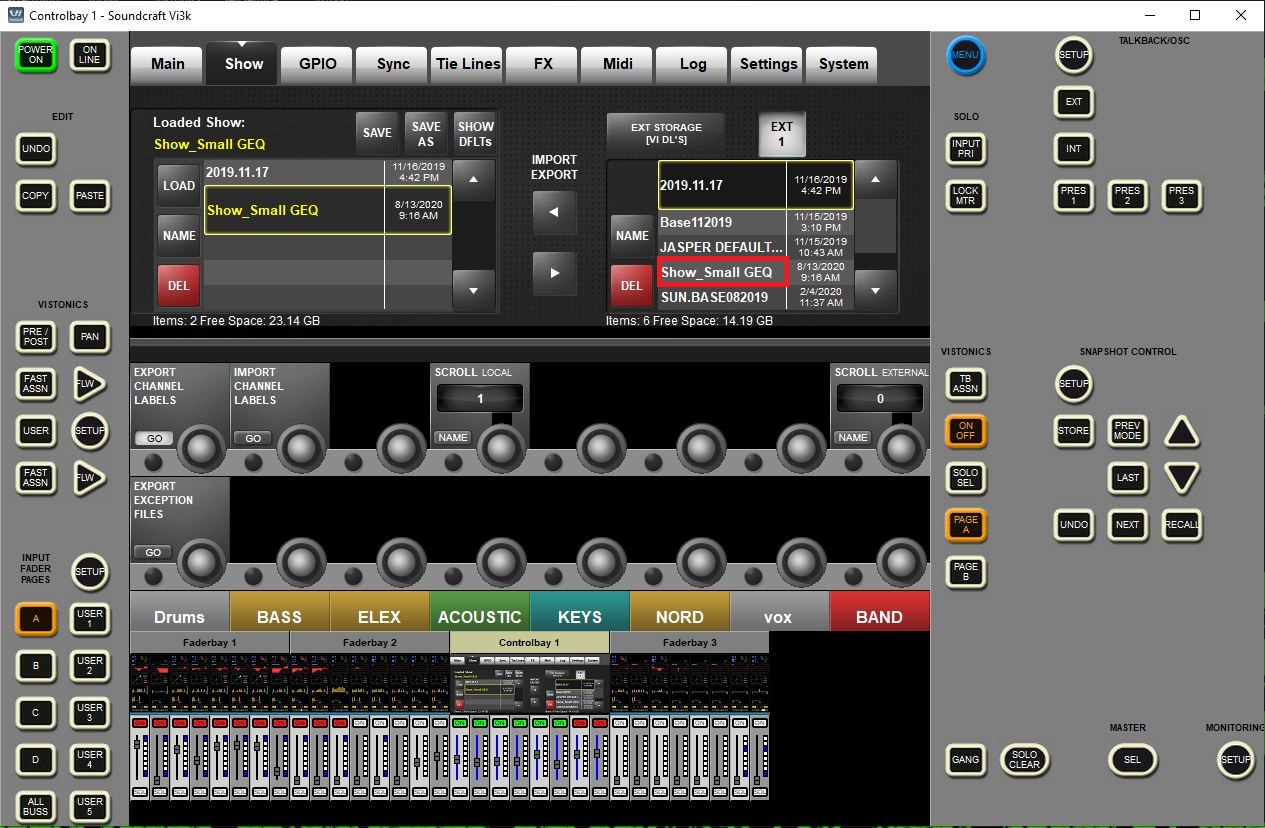
10. Verify Show file copied to USB flash drive
11. Disconnect the USB flash drive from your cosnsole or computer. Your Show file is ready for use.
NOTE: These are most, but not all the scenarios you can run into when sharing show files amongst the various Vi consoles. If you have run into another scenario, not listed in this article, contact your Soundcraft Vi support team for inquiries.