What is Amplifier Monitoring?
Amplifier Monitoring in Audio Architect is a powerful and flexible tool for observing the hardware, software, and network status of any DCi amplifier on a network in real time. It is a useful troubleshooting tool that allows users to quickly find and identify amplifiers that are experiencing problems.
Why Use Amplifier Monitoring?
Amplifier monitoring allows you to see the hardware, network integrity and status of DCi amplifiers in real time. For example – If you have a DCi amplifier that intermittently stops passing signal, you could monitor that amplifiers network signal integrity [Determine if the issue is network related], internal :temperature [Determine if the unit is excessively hot compared to working units, which may be indicative of a hardware problem] , or monitor signal input/output level [Determine if the issue is analog I/O related]. This tool becomes even more powerful if you have a large networked audio system with multiple amplifiers. Monitoring allows you to observe multiple units “at a glance" and can help you quickly identify problems in complex installations.
System Requirements for HiQnet Audio Architect:
64-bit versions of Windows 7, Windows 8.1, Windows 10
Minimum Performance Guidelines:
CPU: 64-bit dual core @ 2.0GHz or better, 8GB of RAM
Optimal Performance Guidelines:
Audio Architect is a computationally intensive application. The hardware requirements needed to run Audio Architect ultimately depends on your venue file. Number of devices and custom panels are the biggest contributors to the amount of memory required. Not having enough memory will have the biggest impact on performance. As a rule of thumb, the amount of memory required should be at least (100MB x number of devices) +3GB.
While the number of processor cores can improve performance, processor clock speed will have a bigger impact on performance.
Note: Local Administrator user rights are required to install Audio Architect. If you are having difficulty installing Audio Architect and are aware that you do not have Local Admin rights on your computer, consult your IT department for access.
Note: We do not recommend configuring amplifier monitoring over VPN.
Panel Overview: Audio Architect Generated vs User Defined
Amplifier monitoring panels are distinguished by two groups: Audio Architect Generated panels or User Defined panels. This tech note discusses Audio Architect generated panels that the app creates automatically when you assemble like groups of amplifiers in a rack. Similar panels are created when amplifiers or their channels are assigned to a room.
User Defined Panels are purpose made, custom panels that monitor unique parameters. They are often used to create panels that monitor amplifiers from different models and families within Audio Architect.
The creation of Room panels and User Defined panels is outside of the scope of this Tech Note.
Audio Architect Generated Panels
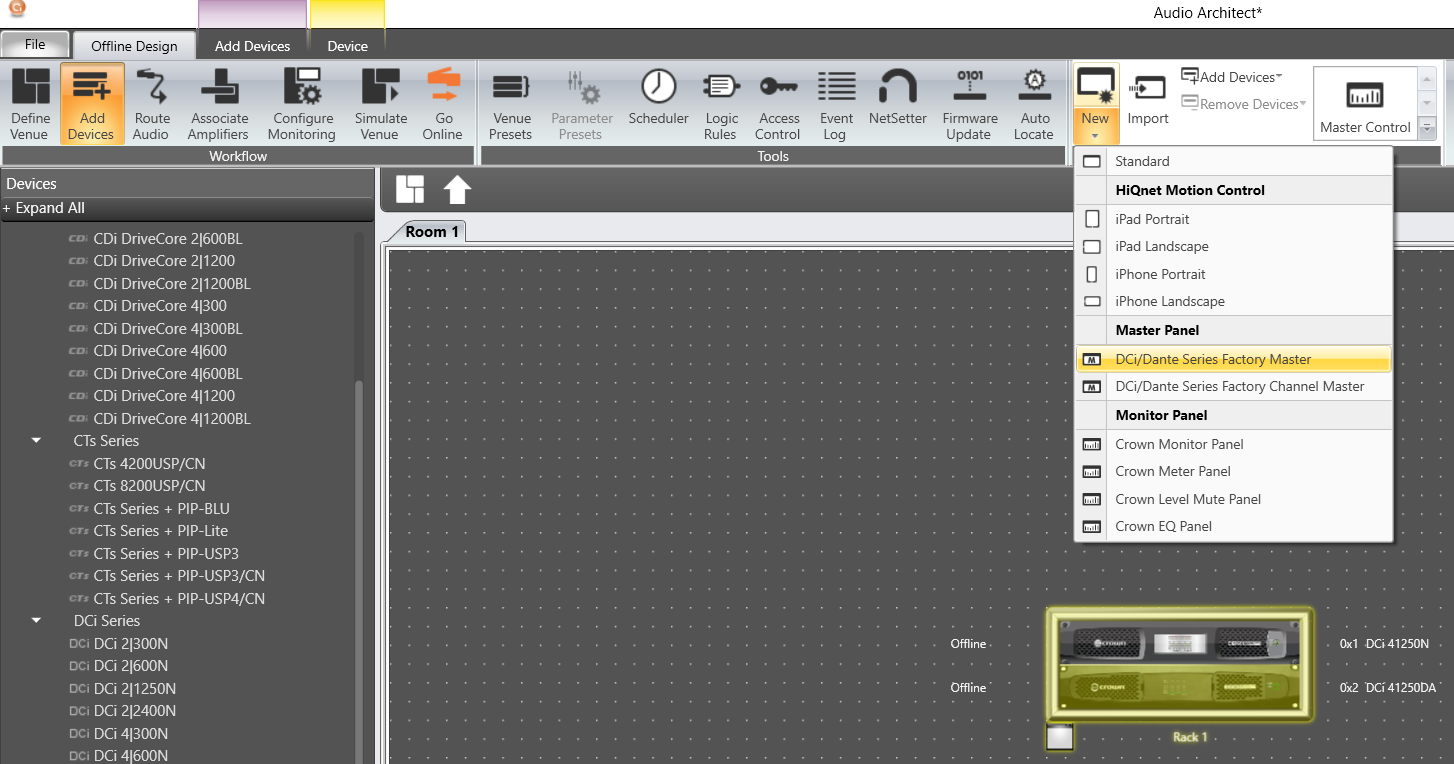
Auto Rack:
Auto rack panels are groups of amplifier panels that are automatically created when you add multiple amplifiers to same rack. Audio Architect creates a list of automatically created control panels that can be accessed by the icon in the bottom lower left corner of the rack. Note that BLU Link /Dante amplifiers will display different Auto Rack panel indicators. If you have both BLU Link and Dante amplifiers in the rack, the specific panels for those amplifiers will be displayed as well.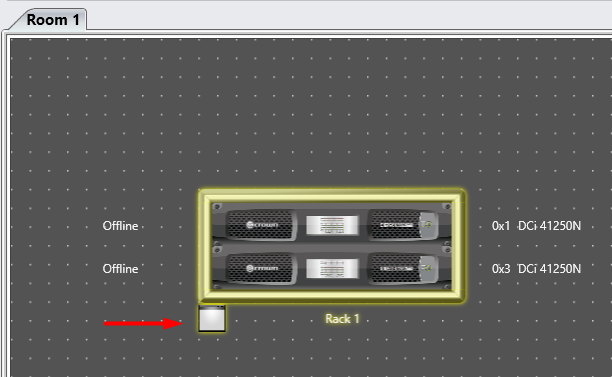
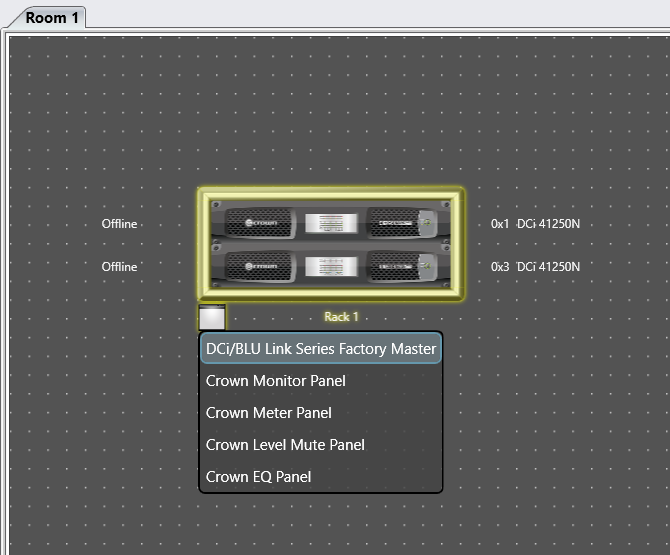
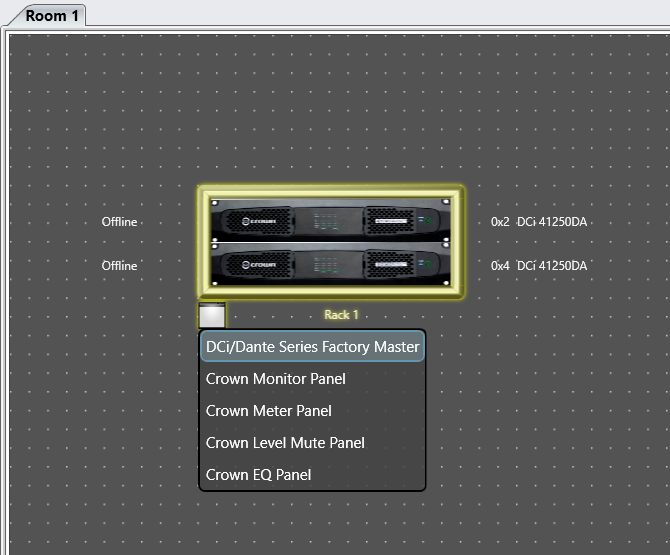
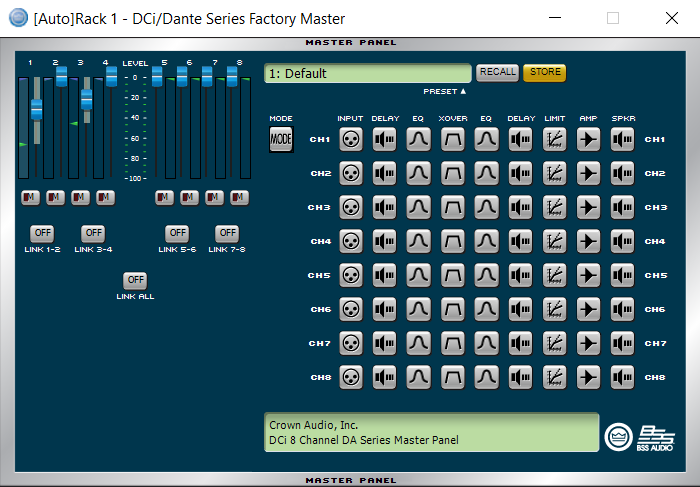
Master:
Creates a single panel for all the of the amplifiers in the rack that are the same series. This panel will display information such as input faders and levels, signal muting, channel linking, preset store/recall and access to amplifier DSP processing. This panel shown represents multiple amplifiers but will show max number of channels available. For example, if you have both a DCI 4|600N and a DCI 8|300N amplifier in the rack Master Panel, the panel itself will display 8 channels that represent the maximum number of channels available from the largest amplifier available. Changes made here are reflected globally; any changes made to channel 1 EQ will globally change EQ on all channel 1 amplifiers in the Master Panel.
Note: There are different master panels for BLU Link and Dante amplifiers. BLU Link amplifiers in the rack will be controlled by the BLU Link master panel. Dante amplifiers in the rack will be controlled by the Dante master panel.

Monitor:
This panel displays signal input/output from the amplifier, as well as visual indicators for amplifier ready or overload state. You can also control signal output via faders. TThe Monitor panel shows all amplifiers in the rack ordered by HiQnet address. The ID button at the bottom of each fader allows you to quickly enter the Master Panel for the specific channel.

Meter Panel:
This panel shows visual input and output signal metering.

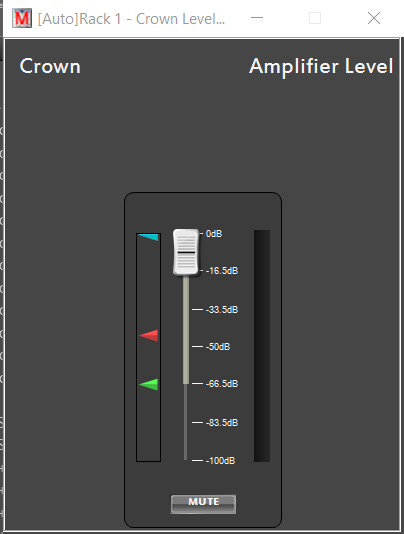
Level Mute:
This panel shows the master fader and master mute for the entire rack. Individual amplifiers can be linked, and offset volumes can be created by clicking on the carrot indicator to the left of the fader. This will open the Connected Parameters panel that allows individual channels to have output volume controls offset. The Force Button allows you to automatically change all amplifier volume levels to the level set above the Force Button.

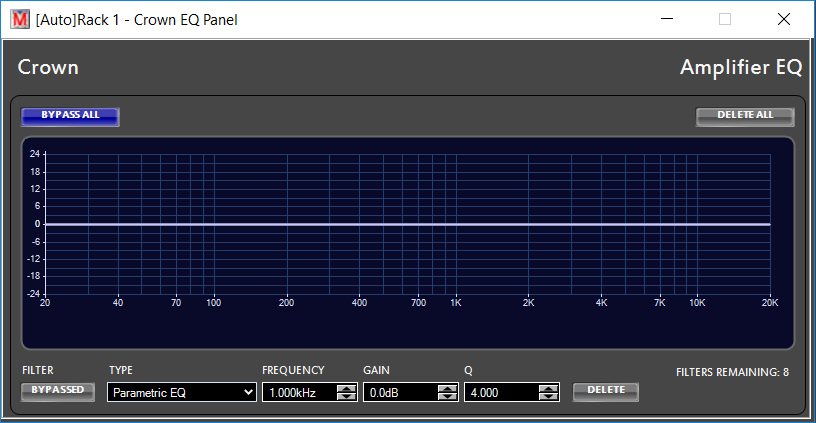
EQ Panel:
This panel displays global EQ for all amplifiers in the rack. From here, you have access to global Parametric, Hi/Lo Shelf, and Butterworth style EQ curves. You can create up to 8 bands of equalization and can manually bypass/engage each band by clicking on the frequency box under the band you wish to modify and click the BYPASS button at the bottom left of the panel. This is a useful tool for tuning amplifiers that are tied to a line array speaker system.
User Defined Panels
User defined panels are created by highlighting amplifiers or racks you specifically want to monitor together. After you have selected which amplifiers you want, you will select the down arrow under the New panel icon in the Panels ribbon at the top of the page.
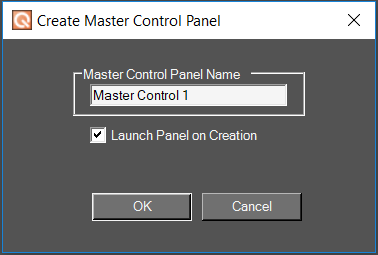
Note: User Defined panels can be created with both similar and different amplifier models and families within Audio Architect. For example – you can create a user defined Monitor panel that shows both a Crown I-Tech HD Series amplifier AND a DCI series amplifier. Once you select which type of panel you want to create, you will be prompted to create a new User Defined panel and name it. You will also be given the option to open the panel upon creation.
Master/Monitor Panel:
These panels are similar in function to the Audio Architect Auto Rack panels with the main distinction being that they only affect the specific amplifiers you have highlighted. This can be a useful function for grouping together amplifiers that aren't in the same racks but are driving specific speaker zones. For example – If you have a single I-Tech HD amplifier powering a line array and have several DCi family amplifiers driving the subwoofer or satellite speakers in a specific zone you can group all these amplifiers together and create a Master panel to control or observe their function.
