CONTENTS
This guide will walk you through the process of configuring your PC running Audio Architect or London Architect to communicate with a network of HiQNet equipment. Before you begin, please ensure that all devices are connected to the same network as the PC running the HiQNet software.
Audio Architect will add exceptions to the windows firewall for the application when you install the software.

Audio Architect installs exceptions for the following:
C:\Program Files\Harman Pro\Audio Architect 2.25\AudioArchitect.exe
C:\Program Files\Harman Pro\Audio Architect 2.25\HiQNetListener.exe
C:\Program Files\Harman Pro\Audio Architect 2.25\HiQNet NetSetter.exe
London Architect does not install exceptions but will add exceptions based on how you answer the windows firewall prompt to allow access for the program. It is recommended that you select allow access for public and private since windows can change profiles.
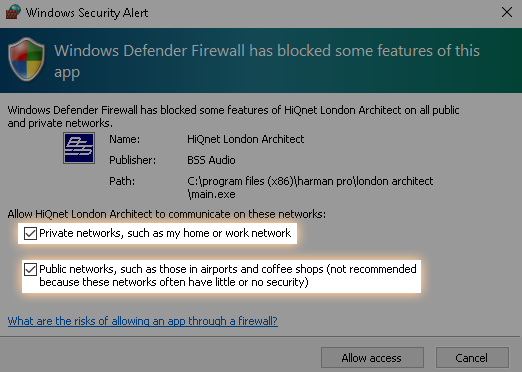
Your IT policy it might require you to manually add an exception for London Architect. You will want to allow the follow executables.
C:\program files (x86)\harman pro\london architect\stub.exe
C:\program files (x86)\harman pro\london architect\main.exe
If you experience any difficulty seeing the Hardware then you will want to turn off the Windows Firewall when working with equipment.
How Turn off Microsoft Defender Firewall
https://support.microsoft.com/en-us/help/4028544/windows-10-turn-microsoft-defender-firewall-on-or-off
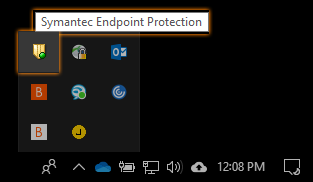
If you have any third party firewall installed such as Symantec End Point Protection Firewall, they may also need to be disabled or have the exceptions added manually.
All HiQNet devices must be in the same IP address range as the PC running the application. There are exceptions using static routes but they are not covered in this document. Achieving this will depend on whether your network includes a DHCP server, and whether you use static or dynamic addressing. All devices come set to Automatic IP/DHJCP from the factory. Only basic network configurations are covered here. For more advanced configurations, consult the Advanced Networking/Troubleshooting guide or a network specialist.
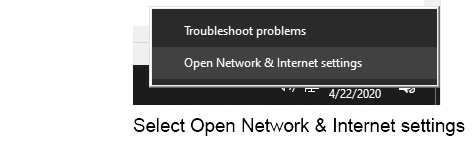
Open the Network and Internet settings page. You can get to this through control panel or through then network icon shortcut on the taskbar.

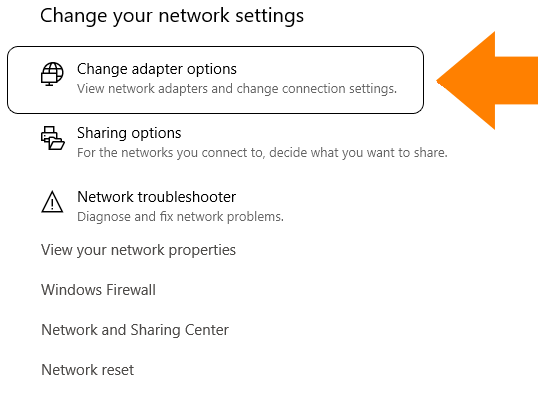
Select Change adapter options
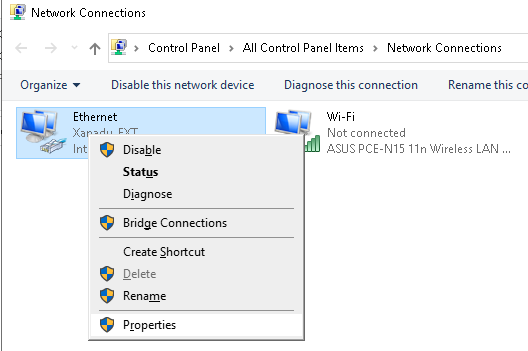
Right click your connection and choose properties
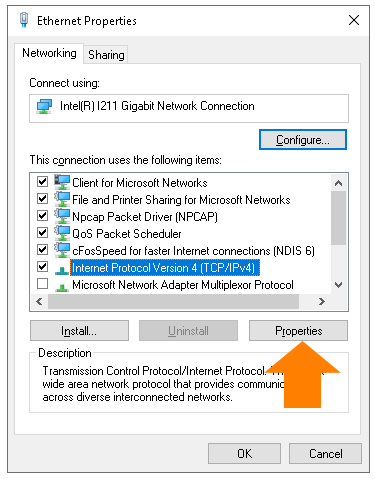
Find and click “Internet Protocol (TCP/IP)” in the list of network services, then click
Properties.
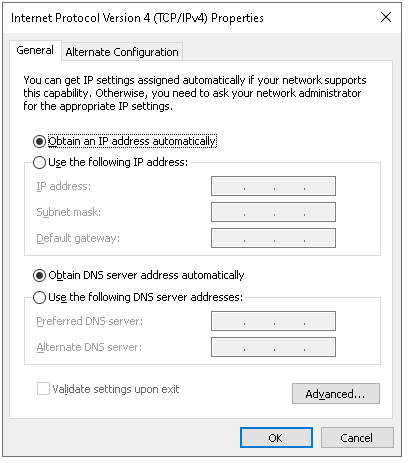
Write down any existing information to be re-entered later.
Using DHCP or automatic IP (link local addressing)
Select “Obtain an IP address automatically”.
Select “Obtain DNS server address automatically”.
If your devices have been assigned a static IP address
Select “Use the following IP address”.
Enter a unique IP address in the same range as the Soundweb London network.
Enter the subnet mask used by the Soundweb London network.
Click OK and close the network properties windows.
This section covers determining which software to use. If you already know which software you are using you can skip ahead to the appropriate section.
Go to Connecting Using Audio Architect
Go to Connecting Using London Architect
For new system you will want to use Audio Architect but if you are connecting to an existing system you will need to know which software to use in order to pull the existing programming. Any system that incorporates DCI or CDI amplifiers, Contrio Wall Controllers or a BLU103 will use Audio Architect as those devices are not supported in London Architect. On all other systems you can tell what software a DSP was programmed with by looking at the firmware or app version.
For configured DSP units such as the BLU160, BLU120, BLU800, BLU320, BLU806, BLU326, the easiest way to tell is to look at the front display.
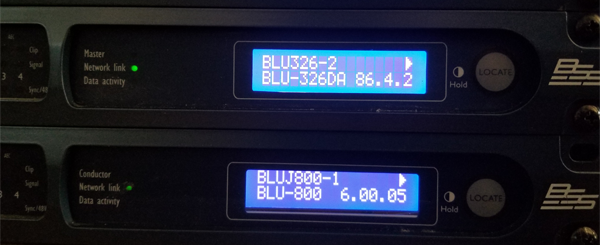
Units showing an 86.x.x were programmed with Audio Architect. The version of firmware displayed may pertain to several versions of Audio Architect so we recommend getting the latest version.

Units that start with a version 6 or lower use London Architect. The version displays the exact version of London Architect software it was loaded with.

On fixed I/O units such without a display such as the BLU50, BLU100, BLU101, BLU102 you can view of firmware by looking at the device in the network window. This will require getting either Audio Architect or London Architect to discover the device.
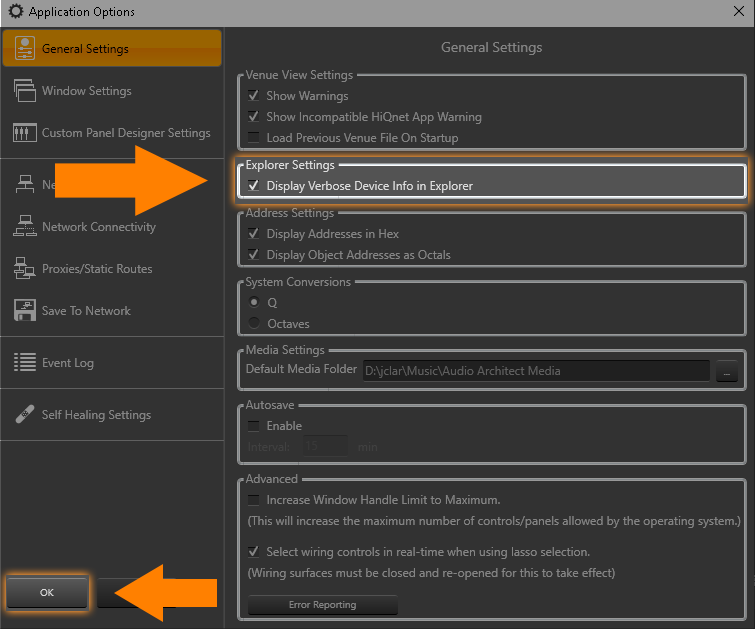
To view this in Audio Architect go to File>Application Options<General Settings. Check Display Verbose Device Info in Explorer and click ok.
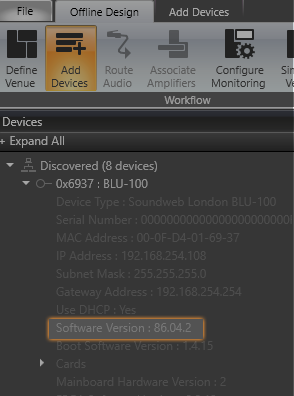
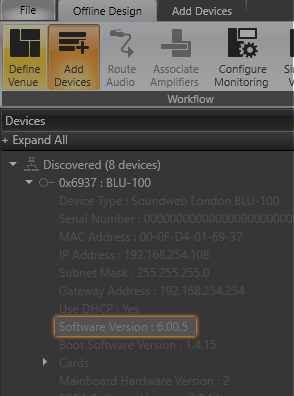
In the devices tab on the left side expand the device you want to connect to. The Software version tells you the version of firmware for each device. The follow examples show both versions
A device programmed with Audio Architect
A device programmed with London Architect.
To view the software version in London Architect select the unit in the network window (view>network) and look at the application version. In this case we would know the unit was programmed with Audio Architect because of the 86.
A device programmed with Audio Architect (86.4.2)

Once you know the version of software you can skip to the appropriate software section.
Go to Connecting Using Audio Architect
Go to Connecting Using London Architect
This section assumes you have already done the steps in the configuring your computer section and that you have your computer connected to the same network.
First download and install the software. You can find the latest version here: https://audioarchitect.harmanpro.com/en-US/software
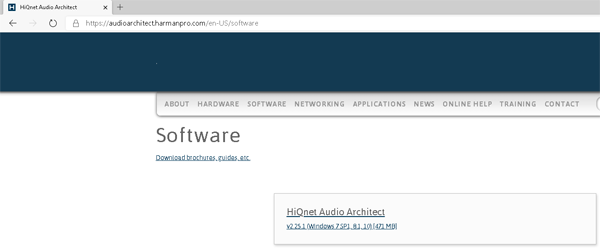
We always we recommend using the latest version if you don’t know the specific version you need.
If you are connecting to an older system and know the version of software you can download legacy versions here: https://audioarchitect.harmanpro.com/en-US/audio-architect-system_architect
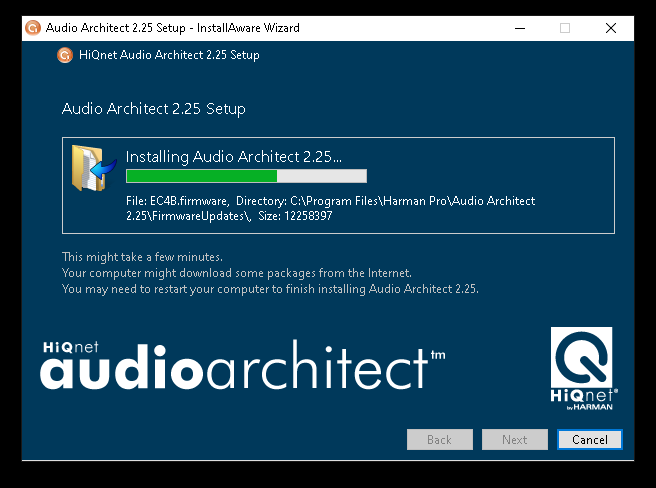
Once the installer is downloaded run the installer, click next through a series of prompts until the software is installed.
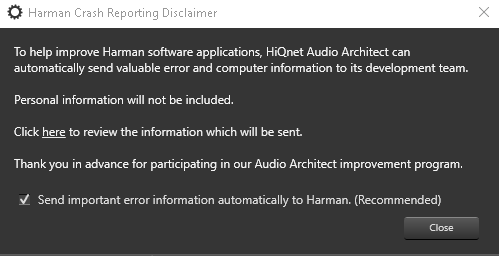
The first time you launch the software, a readme file will launch. Close the readme file and click close on the HARMAN Crash Reporting Disclaimer
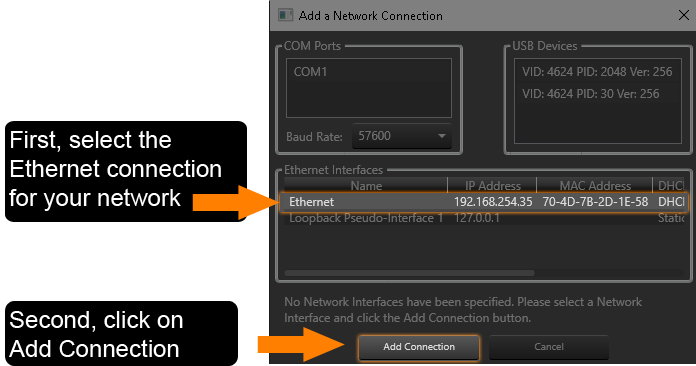
Next you will be prompted to select a network interface. You can change this later by going to File>Application Option and Network Connectivity.
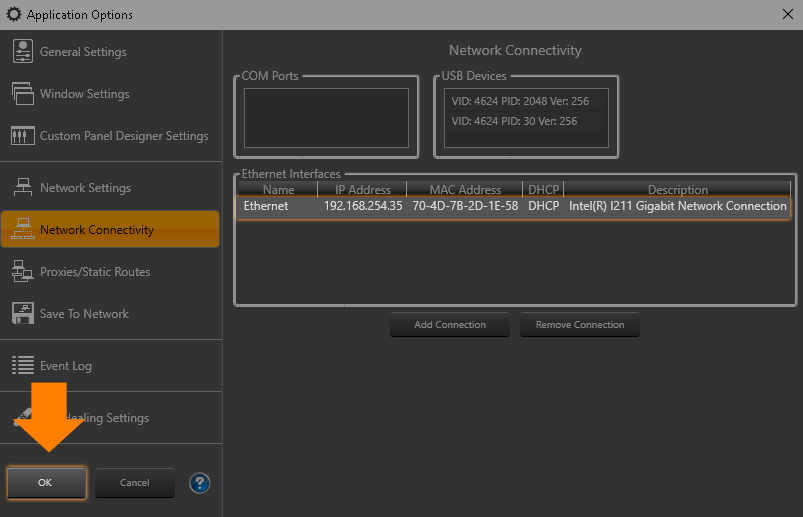
The network adapter should now appear in list of interfaces. Audio Architect will allow you to add multiple network interfaces to communicate with multiple networks. We recommend only adding the interface you are currently using. Click ok to close.
Make sure you are in the Add Devices Mode.

Now Audio Architect will look for devices using your connection. If everything is connected and setup you should see the number of devices detected in the top right side of the screen. If you are showing 0 then you might need to manually address the devices using Netsetter or double check the steps in configuring your computer.

Since there is not an active design file open we should see all of the devices show up as Discovered.
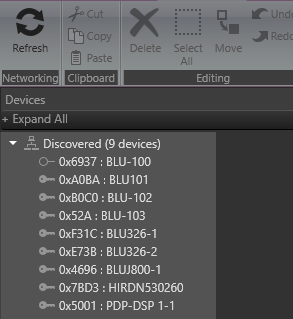
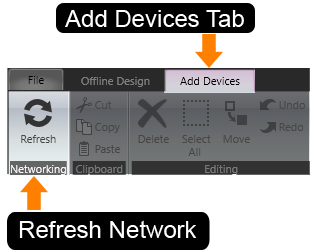
If devices are not immediately detected, you can use the Refresh Button under the Add Devices Tab to refresh the network.
Before you can go online with a DSP you need to have the configuration file (source code).
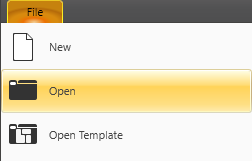
If you have the file, open it from the file menu.
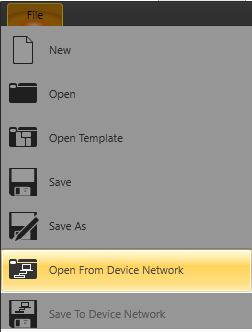
As a backup to system files on the computer, Audio Architect also allows you to save design files on the network devices. If you don’t have a copy of the file you can try opening the last file that was saved to network. Keep in mind that the last person might not have saved their work to the network. Therefore this might not always be the latest and greatest file for the system. First verify Audio Architect has detected the devices you want to go online with (See Verify devices are detected).
To pull the saved file off the device by selecting File>Open From Device Network.
This opens a dialog window that lets you select the design you wish to open.
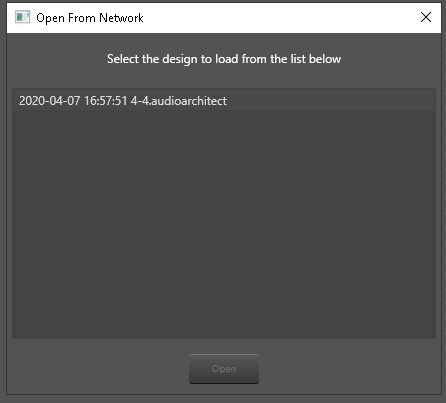
Select the file you want and select open.
Once you have opened the file can save a backup copy on your local computer using the File>Save as. You can now start the process of going live with the devices by selecting Go Online.
Select the Go Online to start the process of going live with the hardware.
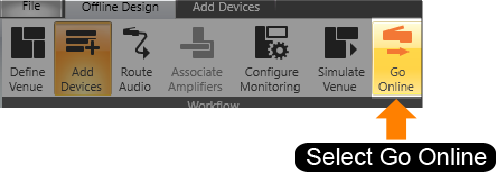
Audio Architect breaks down detected devices into two categories Discovered and Matched. If any devices are un-matched, Audio Architect will take you to Match Devices mode.
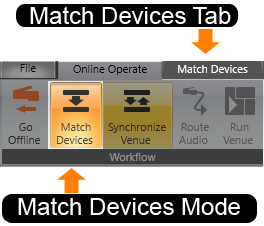
In Match Devices Mode, Audio Architect will allow you to associate hardware with devices in your file.
Discovered devices are devices that are detected on the network. They are not associated with any devices in the currently open design file.
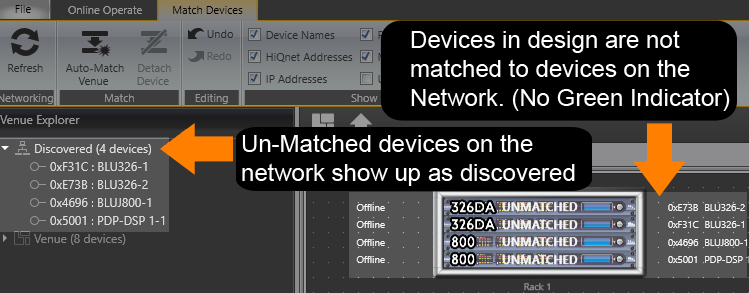
If a device is matched, it will show up in the Room/Rack view with a green matched indicator.

To match a device, simply drag it from the discovered devices to the offline device in the rack you want it to be matched with.
In this example, devices in Rack 2 are already associated but devices in Rack 1 are not. I can associate a Device by dragging it from the column on the right on to the device in the rack.
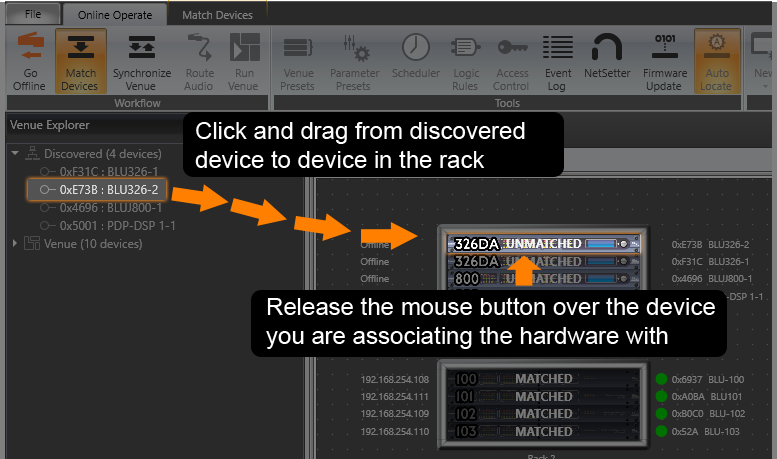
Once the device is matched, the Name and Address are sent to the device on the network. Audio Architect will also show a green Led indicating the device is matched. Once all device are Matched, Audio Architect will progress automatically to Synchronize Venue.

ADDITIONAL INFORMATION ON MATCHING IF YOU HAVE TROUBLE
Note, the device you are matching has to be the same as the device as the discovered device. This means you can’t match a BLU102 with a BLU103 because the hardware is different. It is also means that configured units must have matching card types and slots.
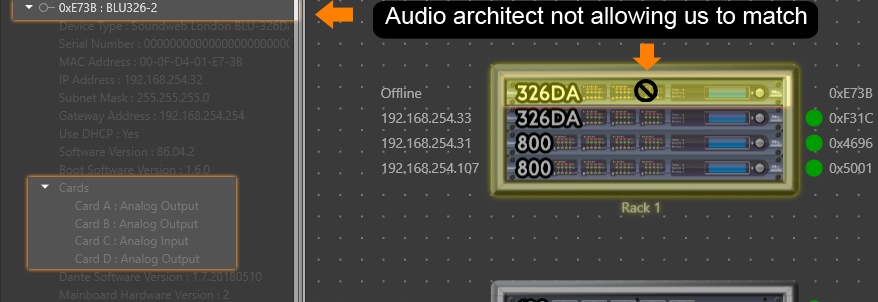
Checking the card configuration
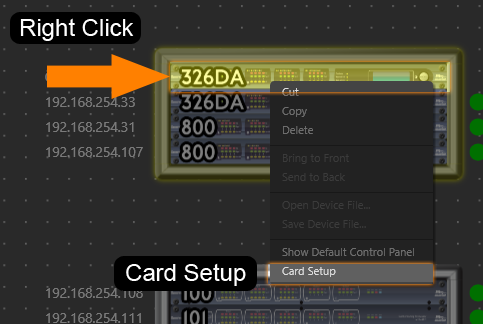
You must be offline to enter Card Configuration. If you are online select Go Offline. Then select the device (left click twice to get the orange highlight) and then right click on the device.
Select card configuration
Select custom
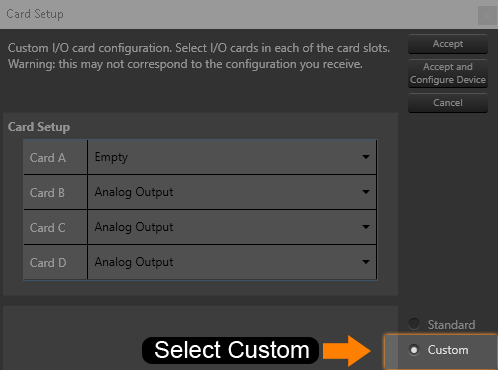
Audio architect now shows you the card setup of the chassis. Now you can compare the two and make necessary adjustments.
LOCKED DEVICES
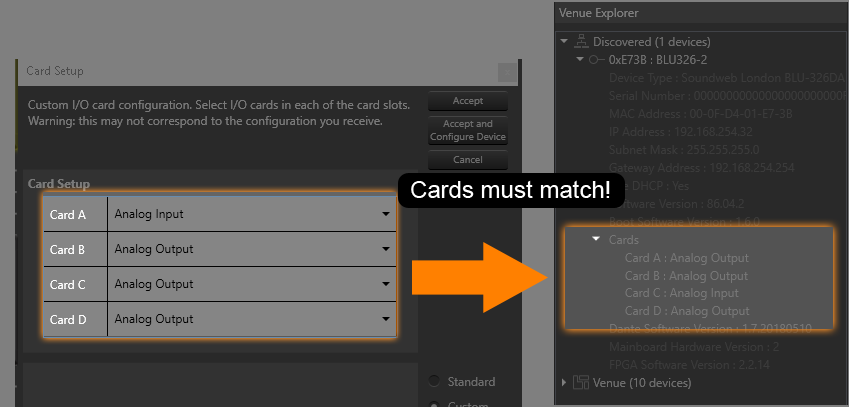
Devices showing the locked symbol indicate they have been locked by access control and must be unlocked using Netsetter before you can match them.
USEFUL TOOLS IN MATCHED DEVICES
AUTO LOCATE
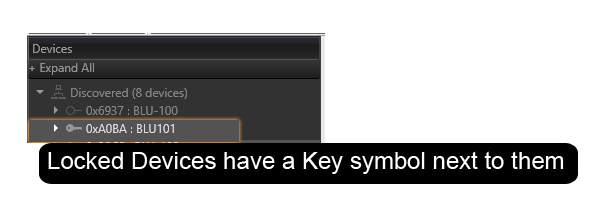
You can identify physical devices using Auto Locate function. This will flash the front panel of any device you select when Auto Locate is active.
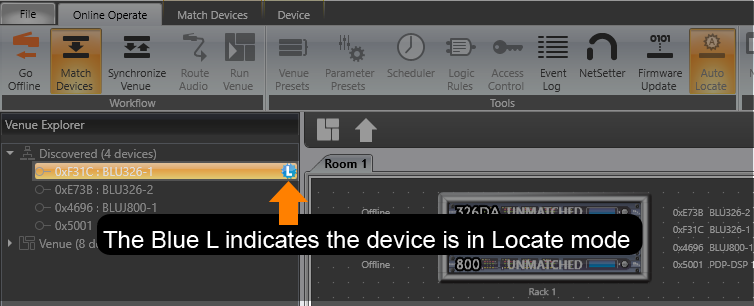
You may also note that you have the Matched Device Tab available which has common functions for this mode.

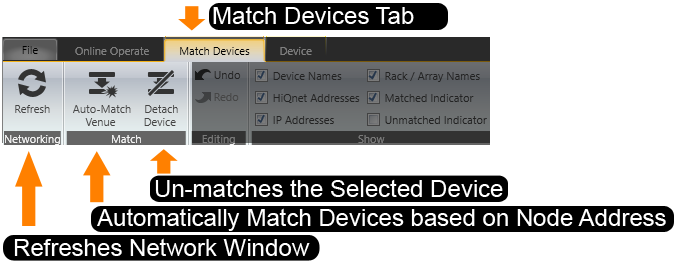
If you associate a piece of hardware to the wrong device just select the device and choose Detach Device. Then you can re-match the device correctly.
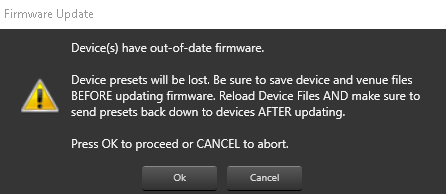
If the devices on the network have different firmware than what is in the version of Audio Architect you have then you will be prompted to do a firmware update.
Click the ok button to proceed
Audio Architect will automatically check the device that have out of date firmware. Select Begin Update to start the process. Audio will stop during this process while devices are loading and devices may restart multiple times.
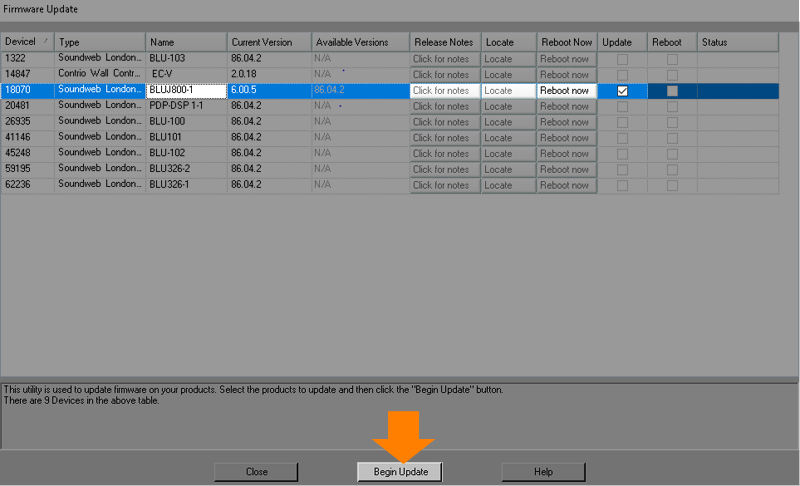
Select close once the update is finished.
Save to Device Network allows you to save a copy of your .audioarchitect computer file (source code) on the Network device so you can pull a copy off later. If you choose no, you can still save your file to the network with the File>Save to Device Network Command.
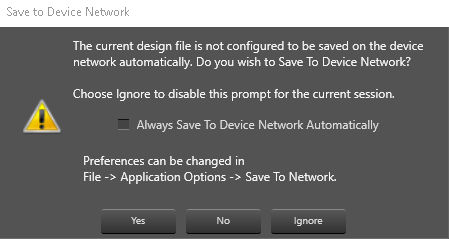
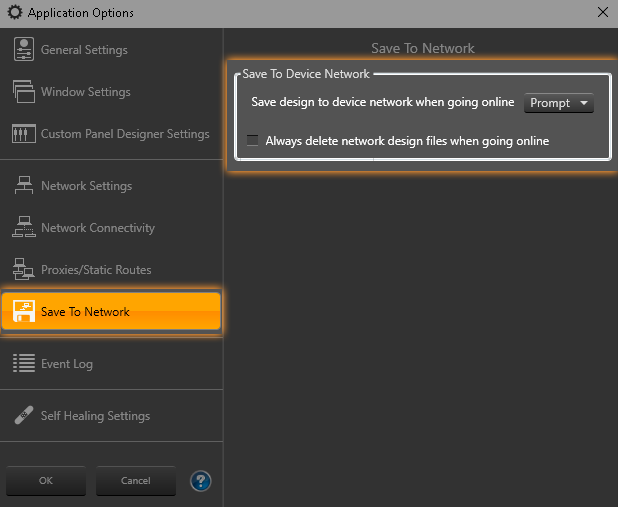
You can always change behavior for this prompt in the application options>Save to Device Network. Choosing yes always saves the file to Network without a prompt. No never saves automatically and doesn’t prompt.
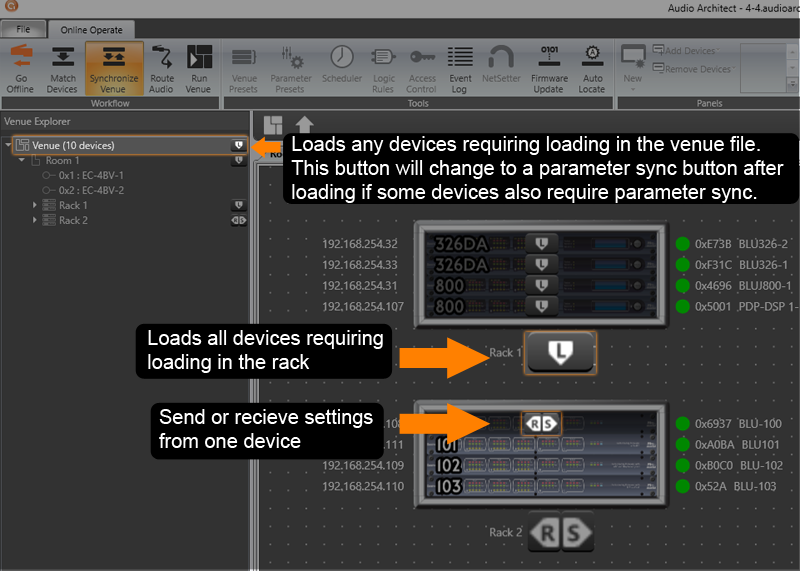
Once in Synchronize Venue Mode you will be prompted with two types of buttons.

Load, or L will load the configuration from the design file into the hardware on the network. If there is not a design file currently loaded on the DSP or if the compile code doesn’t match this is the only option you will have.

Parameter sync (Send|Receive) devices depending on their state. Selecting the R pulls the current settings of the hardware into the computer. The S button stands for send which sends the settings in the design to the hardware devices on the network.
Amplifiers will always require parameter sync because they are fixed architecture and don’t use a checksum. DSP’s have a check sum and will only prompt you to Parameter Sync when the state of their controls don’t match what is store in the design file.
You can load the entire venue at once by selecting the synchronize button at the top of the Venue explorer. This is a global button for everything in the design file. If you have amplifiers and DSP’s you may have to select L at the venue level then send or receive R|S after the DSP are loaded to synchronize the amplifiers. Audio Architect also gives you the option of only synchronizing some devices. The parameter sync and load buttons let you do this by device, rack and room. This is useful if you only want to send settings to some of the devices while doing maintenance in a working venue.
Once all of the devices are synchronized Audio Architect will automatically put you in run venue mode. Congrats you are live with the system.

As you change control parameters while online, the system will respond in real time. The devices will retain their control settings if power is lost, and come back in the same state when power is restored.
You will have to go offline to save any changes you have made to the design file. To go offline and return to design mode, click the “Go Offline Button” on the ribbon at the top of the window.

SELECT THE PC ADAPTER
Netsetter is a useful application to see if things are connected correctly and is also used to change the network settings of HiQNet devices. Netsetter has its own settings for the network adapter. Changing the adapter settings here does not change the adapter in Audio Architect. This is useful if you have more than one network connected and if you want to take a peek at different networks.

If you are still not seeing the devices you may need to configure your firewall or computer IP settings. (See Configuring Your Computer)
(Note: In some cases if the devices have an IP address outside the range of the PC and have a gateway entered they may not be seen in Netsetter until they are power cycled)
Once the device show up here you can verify which device is which through the locate function. However over the Locate column for the device you want to locate and click the button that pops up.

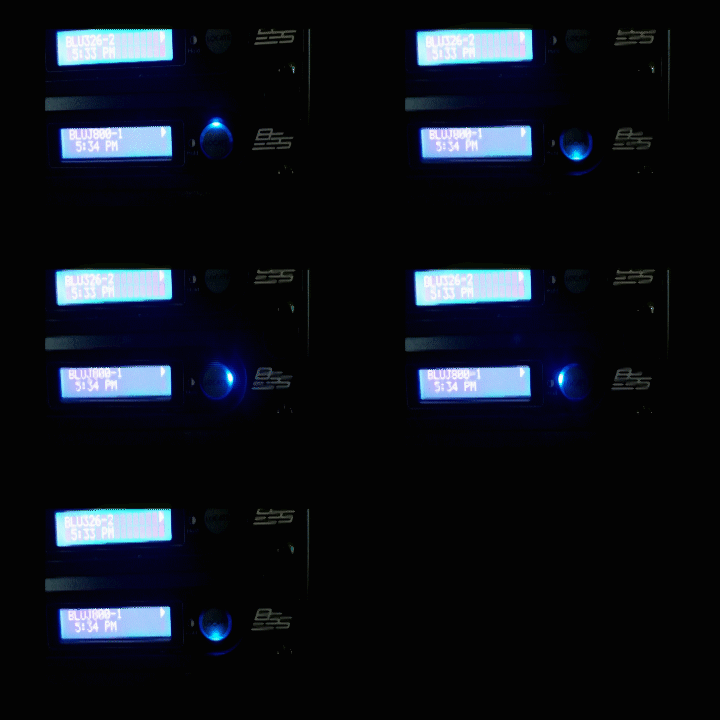
Locating the unit flashes the front panel. This is true all of HiQNet devices.
DSP’s
DCI Amplifiers

ASSIGNING A STATIC IP ADDRESS
To assign a static IP address for a device un-check the DHCP/Auto IP check box and fill in the address in the IP Then select apply changes. Each IP address should be unique and in the same subnet.
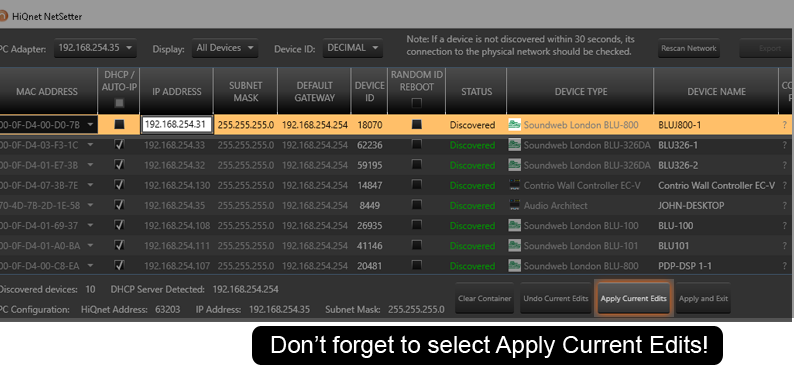
You can also assign a temporary device name which can be useful for keeping track of devices when you go to match them in Audio Architect.
ASSIGNING A HIQNET ADDRESS
All devices on a HiQNet network must have a unique node address. If two devices share the same address this will cause communication issues. If you run into a conflict you can assign a random address to one of the devices in order to re-establish communication. This is done with the random ID reboot check box. Once you select the box and select Apply Current Edits the device will reboot with a new random ID number. This number will get set again once you match the device in Audio Architect which manages IDs in the design file.
LOCKED DEVICES
Devices with access control will show up in Netsetter as locked.

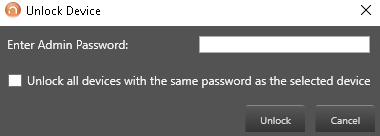
To unlock the device select it and Netsetter will prompt you to unlock the device.
This section assumes you have already done the steps in the configuring your computer section and that you have your computer connected to the same network.
Install the latest version of HiQNet London Architect on the computer you will use for system control. You can download it from
http://www.bssaudio.com/ .
Do not start HiQNet London Architect on the computer until instructed to do so below at ‘Start and Configure HiQNet London Architect’.
If any firewall messages are displayed asking whether to allow network access for HiQNet London Architect or Main.exe, choose “Allow” or “Accept”. The safest option is to disable firewall software while using HiQNet London Architect.
Click “Tools” on the HiQNet London Architect menu and select “Application Preferences”.

Open the HiQNet tab and check the network interfaces connected to the Soundweb London network.
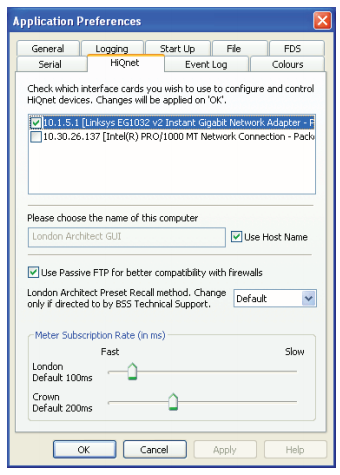
Click “OK”.
Click “View” on the HiQNet London Architect menu and select “Network”.
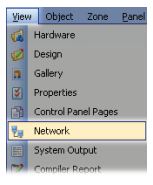
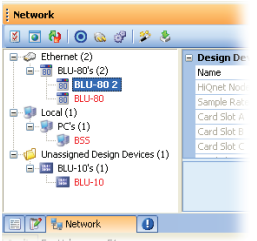
The HiQNet London Architect Network view will open at the bottom of the screen.
Click the green and red Refresh button.

Connected Soundweb London devices will start appearing in the network tree, grouped by model. It can take up to 45 seconds for all devices to be discovered.
The Ethernet category shows Soundweb London devices detected by HiQNet London Architect.
The Local category shows the PC running HiQNet London Architect.
The Unassigned Design Devices branch shows design devices that lack a matching physical device on the network. See the Match Devices section for more information on assigning physical devices to design devices.
All Soundweb London devices on a network must be running the latest firmware included with the version of HiQNet London Architect in use before they may be controlled by HiQNet London Architect. To update the firmware:
In the Network Window, click on the icon shown below to open the firmware wizard.

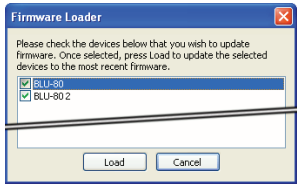
This will display a list of all the Soundweb London devices discovered on the network.
Make sure all the devices listed are checked and press the Load button. The firmware transfer will take several minutes, during which time the devices may reboot several times.
Depending on the layout and configuration of your network, it may be necessary or desirable to change the default TCP/IP settings of your Soundweb London devices. Soundweb London devices default to AutoIP/DHCP mode in which IP settings are obtained from a DHCP server if one is available. If no DHCP server is available, the device will choose an IP address in the 169.254.xxx. xxx range. Soundweb London devices may also be configured to use a static IP address. If the IP address range used by the Soundweb London devices is changed, don’t forget to update your PC’s TCP/IP settings to match once you’re done configuring the devices. You may also want to assign a new HiQNet address to each device to ease management of the network, simplify the configuration of third-party control systems and avoid potential HiQNet address conflicts. Refer to the Network Troubleshooting guide for more information. To change a device’s name, TCP/IP settings, or HiQNet address: In the Network view, find the device you want to change in the device tree under the Ethernet category. Useful information pertaining to the selected device (such as the name, TCP/IP settings, and I/O card configuration) is displayed on the right side of the Network view.
To identify which item in the device tree corresponds to a physical device, click the blue Locate button in the Network view. The Locate button on that Soundweb London device will flash. You can also press the Locate button on the physical device, causing a flashing icon to appear next to the corresponding item in the device tree.

Open the Device Properties window by clicking on the gears icon in the Network view.

Here you can change the name, HiQNet Address and IP address of the selected device. Device names will be discussed in more detail below.
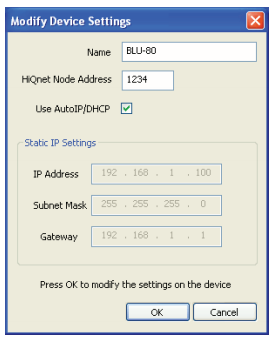
The device will reboot after you press “OK” on the Modify Device Settings window. After reboot, the device will have the new settings. In some cases the device may need to be restarted manually for the new settings to take effect.
If a HiQNet London Architect design has been prepared for the Soundweb London network, you will need to open it now.
If the file is stored on the PC running HiQNet London Architect:
- Click File, select Open, and find and load the file.
If the file is stored on the Soundweb London device network:
- Click File, select Open From Device Network, and proceed as directed.
If you are working from an existing HiQNet London Architect design, the name, model, and I/O configuration of each physical device on the network must match the name, model, and I/O configuration of each corresponding device in the design. The process of assigning physical devices to design devices is called “matching devices”.
To match a physical device to a design device:
Change the name of the physical device to match the name of the corresponding design device. See the Configure Device Network Settings section for instructions on changing a device’s name.
When a matching physical device is found for a design device, a message may be displayed indicating that the HiQNet address of the physical device does not match the HiQNet address of the device in the design. It is recommended that you answer “Yes”, changing the HiQNet address of the design device to match that of the physical device. If a third-party control system (such as those produced by Crestron or AMX) will be used with the design, then it is recommended that you answer “No” to change the HiQNet address of the physical device to match the design, as third-party controllers depend on consistent HiQNet addresses to communicate with Soundweb London devices. See the previous section on changing device network settings if you wish to set a device’s HiQNet address manually.
As each physical device is matched to a design device, its name under the “Ethernet” branch in the device tree will change from red to black, and a green star will appear above the design device in the System Layout window. Remaining unmatched design devices will be shown under “Unassigned Design Devices” in the device tree.
If a design device still doesn’t match its intended physical device after changing the physical device’s name to match, verify that the devices are the same model and that their I/O card configurations match.
Once the process of matching devices is complete, each design device in the System Layout will have a green star, indicating that it matches a device on the network.
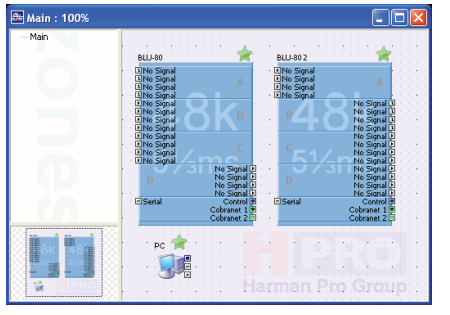
Note: some design objects in the System Layout do not correspond to a network device. These will not be displayed with a green star.
Once the design devices are all matched to physical devices, it is necessary to upload the device design configurations to the physical devices. To upload the device configurations in HiQNet London Architect to the actual Soundweb London devices:
Click on the “Run” button (which looks like a VCR play button) in the tool bar at the top of the window or the “Online” button at the bottom of the window to upload the device configurations to the Soundweb London network and begin controlling the devices. This is called “Going Online”.
Note: This is not the same as saving the design to the device network. If the device configurations in HiQNet London Architect differ from those previously uploaded to the Soundweb London devices, the Load window will appear and show which devices on the network need their configurations uploaded.
Press the green arrow at the top of the list to upload configurations to all devices sequentially, or press the green arrow next to each device to upload the configuration for that device individually. This will overwrite the design currently in the device with the design open in HiQNet London Architect.

After loading is complete, press “OK”.
If the HiQNet London Architect device configurations match those on the Soundweb London devices, the Parameter Synchronization window will appear, allowing you to send control parameters to or receive control parameters from the device.
Press the green arrow at the top of the list to send current control parameters in HiQNet London Architect to all devices, or press the green arrow next to each device to send control parameters to that device individually.
Press the red arrow at the top of the list to receive current control parameters from all devices, or press the red arrow next to each device to receive control parameters from that device individually.

As you change control parameters while online, the system will respond in real time. The devices will retain their control settings if power is lost, and come back in the same state when power is restored.
You will have to go offline to save any changes you have made to the design file. To go offline and return to design mode, click the “Stop Button“ in the tool bar at the top of the window or the “Online” button at the bottom of the window. You can go back online by clicking the “Run” or “Online” buttons again.