104SET-BT Bluetooth Desktop Reference Monitors:
JBL 104-BT & 104-BTW compact reference monitors with Bluetooth, the newest models in the 1 series line,
they’re perfect for recording musicians, producers, podcasters and vloggers as well as professional audio engineers seeking
an accurate portable reference with Bluetooth streaming.
/1.PNG)
Quick setup guide:
1. Speakers Connection:
1. Place speakers on your work surface at arm’s length according to diagram.
2. Using the supplied wire, connect the Extension Speaker to the Master Speaker by inserting the positive
(red) wire and the negative (black) wire to the corresponding terminal.
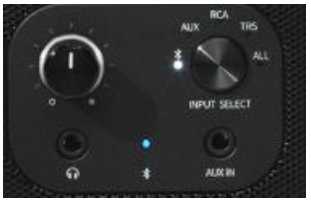
2. Speakers Different Inputs:

a) Connect your sound source to the master speaker using one of the following inputs.
b) The Aux (3.5mm) input can be used to connect to personal devices such as cell phones, laptops, and MP3 players.
c) On the back panel, you have two input options. You can connect professional equipment with high level (+4dbu) outputs,
such as audio interfaces and monitor stations, to the ¼” (TRS) inputs.
d) RCA Left and Right Inputs can be used to connect consumer equipment with low level (-10dbv) outputs, such as CD player or turntables.
e) The INPUT SELECTOR button can be used to switch between Bluetooth, Aux, RCA, TRS, or ALL inputs. When ALL is selected,
you can monitor all inputs sources simultaneously.
3. Bluetooth Pairing:
To Pair a Bluetooth device, hold down input selector button to change to Bluetooth and push, input select button until LED begin flashing,
will hear a chime. On your phone, laptop or tablet select the 104SET-BT from BT menu, once connected the Led will stop flashing;
also will hear a chime noise.
4. Sleep Mode Disable & Re-Enable:
To Disable Standby Mode, use the following procedure:
1. Set POWER switch to the OFF position.
2. Connect headphones to the HEADPHONE output on the MASTER MONITOR.
3. Set the VOLUME control to the minimum (full counter-clockwise) setting.
4. Set the POWER switch to the ON position. Within a period of 15 seconds
Complete the following steps:
a) Disconnect the headphones.
b) Reconnect the headphones.
c) Disconnect headphones again.
d) Reconnect headphones again.
NOTE: This procedure must be completed within 15 seconds after performing Step 4.
The POWER LED will flash rapidly 5 times to indicate the process is complete.
To re-enable Standby Mode, use the following procedure:
1. Set POWER switch to the OFF position.
2. Disconnect headphones to the HEADPHONE output on the MASTER MONITOR.
3. Set the VOLUME control to the minimum (full counter-clockwise) setting.
4. Set the POWER switch to the ON position. Within a period of 15 seconds
Complete the following steps:
a) Connect the headphones.
b) Disconnect the headphones
c) Connect the headphones.
d) Disconnect the headphones
NOTE: This procedure must be completed within 15 seconds after performing Step 4.
The POWER LED will flash slowly 2 times to indicate the process is complete.
5. Increase the setting of the VOLUME control (rotate clockwise).
6. Standby Mode will now be active, after 19 minutes with no signal present; the 104 Reference Monitors will enter Standby Mode.
